I've been seeing tons of string art popping up all over the web and decided to try my hand at a piece of my own. I really didn't want to mess with hammers and cutting wood and all that though, so I used cork board instead. Easy to work with, light weight and cheap! What's not to love?

Here's what you'll need:

{Before I started this project, I unrolled the cork boards and placed a bunch of heavy books on them to straighten them out a bit. I left them like this for a day.}
Each piece of cork board is only about 1/32" thick - definitely not enough to hold a nail stable. So I stacked three together. Use your glue gun to glue them together. Put them back under some heavy books for an hour or so so allow to dry completely.

You can download my template for the word "dream" here. The "d" and the "m" will print in two parts on two different sheets. Cut them all out and assemble into a single word using some Scotch tape. It should look like this when you're done.
{NOTE: If you're interested in creating a different word, I shared the font used for this project here.}

Reinforce the spaces between the "e" and "a" and "m" with some additional tape. That will make the entire template more stable to work with. Don't worry about cutting out the inside of the "d", "e" and "a". Not necessary!


Center your template out on your cork board. I decided there was too much cork at this point and wanted to trim away a few inches from the top and bottom.


IMPORTANT! DO NOT TRIM THE CORK BOARD WITH A BOX CUTTER! IT WILL TOTALLY SHRED AND FALL APART ON YOU. USE SCISSORS AND IT WILL CUT NICELY WITH MINIMAL SHREDDING.


I really wanted the look of a white background for my string art so I decided to paint the cork. If you're fine with the cork color/texture background, then feel free to skip this step. I used some leftover latex paint I had (BM Sea Pearl if you care) and a Styrofoam mini roller. Nothing special.

When the paint dried, there was a little bit of buckling of the top layer of cork board and I could see where I had missed spots with my hot glue. Don't worry if this happens to you, it's completely not noticeable after you're done.

At this point you'll want to flip the entire canvas over and apply your hanging strips. Do this now so that you don't have to deal with it once all your nails are in.

Center your template and tape it down.

Insert your nails into the cork, following the outline of your template. They should push in fairly easily with a little pressure (except when you hit a glob of hot glue below...then you'll need to push a bit!) Trace the inside of the "d", "e" and "a" by pushing the nails right thru paper.

When you've traced the entire template, carefully remove the paper. Work slowly and you're nails will stay in place.

Here's my canvas ready for stringing! I actually thought it already looked pretty cool at this stage.

Now the fun part - stringing! I decided to do this in a rainbow spectrum effect but you could easily do it in all one color as well.

Starting with my dark purple, I tied onto a nail at the top of the "d".

Now you're on your way! Just start weaving in a back and forth fashion. The less you think about this the better. I actually found it to be quite therapeutic. Just let it flow. If you don't like the way a certain section looks, unwind and do it again. It's very forgiving!


I kept moving through the color spectrum as I worked my way through the word. I found that overlapping the colors a bit helped to blend each color into the next.


The last thing I did was to frame out the whole piece with some white duck tape. The edges were looking a little raggedly after I trimmed them and I wanted a cleaner look.

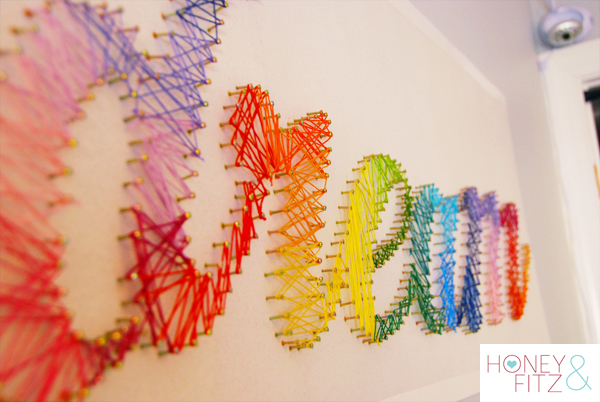
Here's the final result hanging in Knox's nursery. I was ready to switch things up from the oil pastel art I created before he was born. I really love how it turned out and because it's lightweight cork, I'm not stressed about hanging it over his crib (I'm always paranoid about stuff falling on him!)


In retrospect, I wish I'd taken the time to measure out how many colors I had and how much space I was working with so I only used one full run of the color spectrum across the word (I had to repeat the purple right at the "m".) Oh well, I still like it!


TOTAL COST: $56.88 (pretty good for a piece this big I think!)
Cork: $26.97
Embroider floss: $8.97
Linoleum nails: $7.56
Hanging strips: $10.38
Duck tape: $3.00
What do you think? Will you be trying your own string art? If you want to start with something a little smaller, check out my guest post today over at Hello Bee. Same idea but all you need are some cork tiles!


0 Comments:
Post a Comment