
 Our apartment has a plain old white fridge. So, to jazz it up a bit, I made some Pinhole Press photo magnets. I used snapshots of Toby, as well as some photos I found online of my favorite old-school celebs (including Mick Jagger, obviously). Our gallery display makes our whole kitchen feel so much cozier, and Toby loves pointing himself out. For Mother's Day, I'm going to send my mom a package of Toby magnets:)
What's on your fridge? Aren't personal magnets awesome? Which photos would you put on magnets? xo
Wednesday, April 25, 2012
Fridge Makeover: Photo magnets
Fridge Makeover: Photo magnets
Our apartment has a plain old white fridge. So, to jazz it up a bit, I made some Pinhole Press photo magnets. I used snapshots of Toby, as well as some photos I found online of my favorite old-school celebs (including Mick Jagger, obviously). Our gallery display makes our whole kitchen feel so much cozier, and Toby loves pointing himself out. For Mother's Day, I'm going to send my mom a package of Toby magnets:)
What's on your fridge? Aren't personal magnets awesome? Which photos would you put on magnets? xo
Thursday, April 5, 2012
Kitchen Utensil & Spice Organization
I finally got my kitchen utensils and spices under control! I shared my dilemma and photos of my crazy, messy drawer(s) here. But just to recap, here's what I was dealing with:

Directly to the right of this drawer is where I was keeping most of my spices. I knew if I was ever going to get the utensils under control, I needed to reclaim this spice drawer for utensil storage. So the spices needed a new home.

The other issue is that the spice collection had spilled over from this drawer into a cabinet directly above it. I was using one of these tiered rack things but overall I felt like there was just too much real estate being dedicated to spices. So my plan was to reclaim all that space by making use of the unused space on the inside cabinet doors.

I used a a MagnaPods sheet cut to fit the inside of my cabinet door. If you've never heard of MagnaPods, they make a very thin steel sheet with a peel off adhesive back. Basically you can turn any surface into a magnetic one. Yes I know you can use magnetic paint but in my experience, it's super hard to work with and get an evenly magnetic surface. The MagnaPods was literally measure, cut, peel and stick.

I bought two sets of 4 oz magnetic tins from this eBay seller and one of the larger 16 oz tins. They come with magnetic circles that you just stick onto the back.


Now the fun part! I love my label maker :)

I used the larger tins for bigger spices like bay leaves and stuff I use a lot of like pepper flakes. It would also be good for cinnamon sticks, etc.

On the other door I used these spice holders. They're perfect for holding larger bottles and stuff that I didn't want to decant into the tins.

So now I had an empty drawer and YUCK! This is why I wanted to get the spices out of the drawer in the first place!

I played around at Bed Bath and Beyond until I found a configuration of their Wilton Mesh drawer organizers that worked for me. I knew I needed to err on the side of more vs. less organizers otherwise everything would end up a jumbled mess before long.

Happiness!!

Also I was able to use 2 extra 16 oz tins to organize two things that we always seem to be looking for at the house but can never find - safety pins and rubber bands! Now they're right on the side of the refrigerator and close at hand.

Friday, March 2, 2012
Realistic Home Inspiration
I've been having a bit of an adverse reaction to Pinterest lately. Don't get me wrong, I am still totally obsessed with the visual bookmarking site and could/do spend hours happily pinning. Most of the time I'm pinning outrageously beautiful home spaces - perfectly styled laundry rooms, bathrooms dripping with carrera marble and kitchens larger than most city apartments.
It all started with this kitchen image. Amazing? Sure it is. But seriously, who has not one but TWO ten foot islands in their kitchen?!?!

I love to ooooh and aaaaah over these rooms as much as anyone but it got me thinking -

Not every kitchen has room for an island and many people are struggling with renovating older homes to get that open floor plan look. This is a classic example of how to do that. There was very likely a wall separating this room from the dining room where the kitchen peninsula is.

What a difference a great stove, a little bit of graphic tile and nice counters can make. There's nothing special about those (dated) cabinets but I still love the way this small kitchen looks.

Beautiful slate floors ground the whole space but you don't need much of it to transform this small room.

I love what Lauren Liess did with her 70s style kitchen with just some paint. The before and after is really inspiring and proves you don't need to spend a ton.

I posted about the light in this next kitchen here but the entire room is worth reviewing. It's not huge but boy is it beautiful. See the full transformation here.

I love my walk-in pantry but I am VERY aware that the majority of people don't have the luxury of so much space for food storage. So I love seeing uber-organized reach-in pantries like this where every inch is being utilized to the max.

Gorgeous laundry rooms are all over Pinterest but how many of you out there have to drag yourselves down to the basement to do laundry? Not exactly inspiring right? I love this next image precisely because it's so clear that it IS a basement yet it's still a bright, happy space.

Sometimes you have to make unorthodox decisions in order to get convenience into your life. Laundry in the kitchen? How very European of you! Sure, you'll have to give up some kitchen cabinet storage but I know lots of people who would prefer this over a basement laundry set up.

This bathroom is doing double duty as a laundry room. Hey why not...the plumbing is already there so if you have the space, make use of it!

I am obsessed with mudrooms. OBSESSED. Probably because we don't have one. I would gladly give up a bedroom in our house if I could move that square footage downstairs for a mudroom. But I can't so I'm always on the lookout for ways to create a mud "space" without an actual room. Love these next images for that exact reason.


A small mud nook. I love that it looks real. Hats, shoes, jackets...it's all out there and still looks cute. Also note the oil drip pans tucked underneath for the shoes. Brilliant to catch all that outside ick.

I am a firm believer that no matter how outrageous and over the top a room is, there's always something you can take from it and incorporate into your home. It could be as large as the perfect light fixture or as small as how to creatively place accessories on a bookshelf.
But isn't it nice to see images of beautiful AND attainable spaces sometimes? A realistic image can inspire ACTION. It can get you measuring and hammering instead of pinning and wishing. And while I recognize that we all have different definitions of "attainable" is, I think we can all agree that these rooms are at least more in the realm of possibility than a kitchen with two ten foot islands!
Thursday, February 9, 2012
Kitchen Aid Mixer Storage
Before we fixed up our pantry, I had a love/hate relationship with my Kitchen Aid mixer. Of course I loved all the tasty treats I could churn out on it but I hated how heavy and bulky it was. The thing is a work horse in the kitchen, but it takes up so much room, it almost needs its own zip code.
Thankfully my baking cart keeps it tucked away and at the ready and at just the right height. No more lugging it from a low cabinet up to the counter top.

I'm very aware that we'll likely never live in another house with a pantry the size of the one we have now. So even though my mixer has a cozy home for now, I'm always interested in what the other options are.
I think most people's mixers end up right where this one is - in a deep corner on their counter. This works well if you've got the counter space to dedicate AND you're an avid baker.

Another option for the avid baker who doesn't want their mixer on display all the time. A perfectly sized baking appliance garage. And how great is that marble counter for baking?!

via Elle Decor
In lieu of a built in solution, I really like these armoires turned baking stations. If you have the floor space in your kitchen, I think this is brilliant.

via BHG

Another great "hide away" option - pullout appliance sliders in your bottom cabinets.

My favorite mixer storage solution has to be these amazing appliance caddies. They're heavy duty and effortlessly raise your mixer from a bottom cabinet up to counter height. You have to dedicate what essentially amounts to a entire cabinet for this option but I think it's a worthwhile tradeoff for the counter space you'll free up.
{BONUS POINTS: Install an electric outlet inside the cabinet so the mixer is not only available but plugged in when you're ready to use it!}

via Kraft Maid


via Mullet Cabinet

This is the hardware you need to get yourself some of this fancy mixer storage. Note that it's the hardware only - you'll have to provide your own shelf for the mixer to sit on top of but even a basic cutting board would work.

The DIY Network has a great tutorial for how to rework a kitchen cabinet for one of these lift mechanisms here.
Where does your mixer live?
Thursday, January 5, 2012
An Organized Breakfast Cabinet Station
The premiere issue of HGTV Magazine included a feature on designer Linda Woodrum's kitchen. Linda is the designer of all the HGTV Dream Homes. I love getting a sneak peak inside designers' homes and seeing how they live. Her style is very comfortable and approachable which I'm a big fan of.

How about this built in china cabinet huh? I love the X's in the doors. So cottage-y and perfect for the Hilton Head setting.


But my favorite part of her kitchen was the peak inside this one cabinet that she's dedicated to her "breakfast bar". Everything you need for breakfast in one, easy to reach spot. I love how simple this is, it just makes so much sense! Why not put everything you're going to use in one spot instead of running all over the kitchen?
Clearly this didn't happen by accident as she had the forethought to plan an electrical outlet in this cabinet for her toaster oven. Must remember this for future kitchens!!

Some other smart people who are making their mornings easier. Even without room for bowls and mugs it just makes sense to put the toaster near the coffee maker right?


No counter near your coffee maker? No problem! Check out this fantastic idea! A pull-out (but more importantly tuck-away) surface to prep on. LOVE THIS!

Overkill? Um...perhaps a tad. This is like having a Starbucks in your kitchen! But I guess if you're Martha you can do that sort of thing.

Some simple shelves and pretty glass jars with cereal = instant cereal bar.

Same idea, but kid appropriate! This would be great in an island cabinet so little ones could help themselves...err...or maybe not?

The idea of organizing by purpose makes so much sense, I don't know why I never thought to apply it to breakfast. I'm already doing it with my baking in the pantry.
And everyone does it with diaper changing supplies on their changing table.
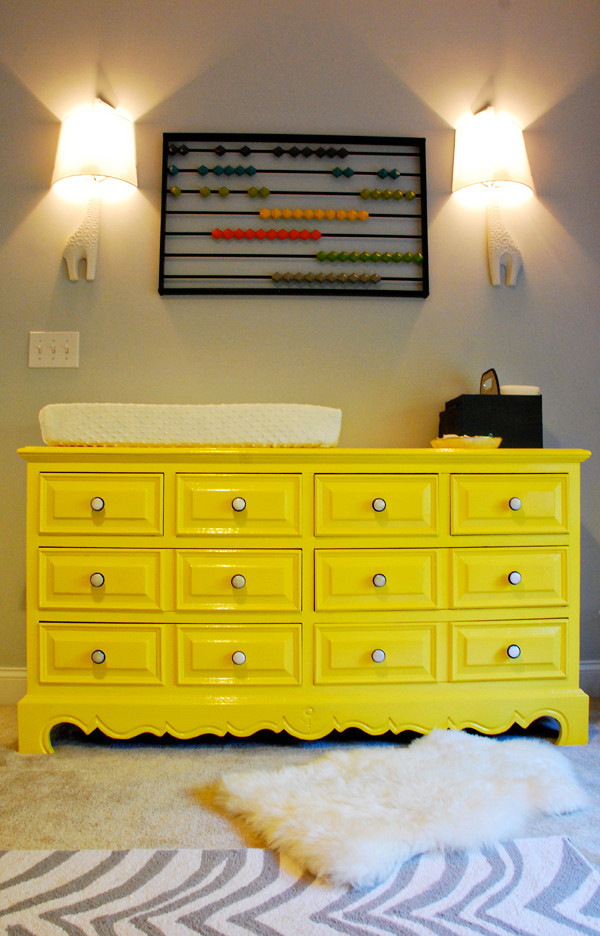
So why not breakfast right? Right now my espresso machine and my toaster are at opposite ends of the kitchen.
Do you have a breakfast "center" in your kitchen?
Subscribe to:
Posts (Atom)
 |
 |
 |
 |
 |
 |
 |
 |
 |
 |
 |
 |
 |
 |
 |
 |


