Thursday, June 16, 2011

A home for my DIY stenciled rug (for now)

Lest you think that because I have a blog about pretty home stuff that my entire house is "done", today I'm sharing one of the most un-"done" rooms of all (one of...as in there is one more room that is even more of a disaster than this one!)

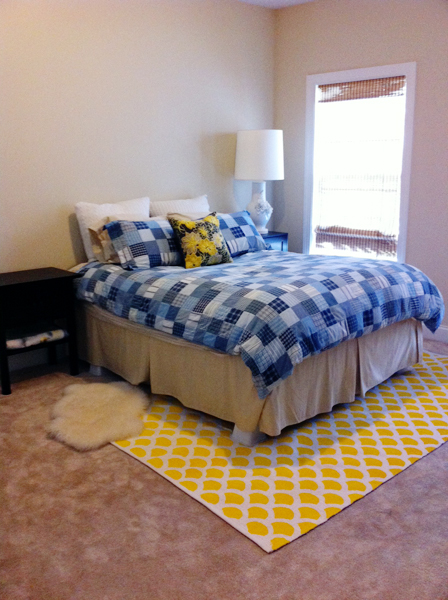
This is our second guest room. Eventually it will be Knox's big boy room where I'll set up the pair of Jenny Lind beds I got on Craig's List. But for the last 4 years it's looked like this.

photo


I'm always looking for ways to make it look better in there without spending any money until I convert it into Knox's room. Enter my DIY stenciled rug.
photo(7)


There is virtually nothing in this room that I care about at all. The duvet set is old Pottery Barn. The side table with the lamp on it is old Target. The other side table is old Crate & Barrel. Same beige color that was on all the walls when we moved in. Same beige carpet. The mattress and box spring were Mr. H+F's from his bachelor days.

{Funny story: This box spring is being held together by a few well placed nails. I helped him move into an apartment in Boston over 4th of July weekend about 9 years ago and the box spring got stuck in the staircase for 4 hours. Love those 200 year old brownstones! Totally jammed...not going anywhere. We had to take a saw to it and break it in half than nail it back together once we got it up the stairs.}

The only things I do like in this room:

My blanc de chine lamp that I found at the flea market years ago.

photo(2)


Photos from our trip to Thailand:

photo(6)


My collection (if you can consider 2 items a collection) of vintage suitcases:

photo(5)

Crazy what a little color can do right? Maybe the happy yellow will make my guests forget that they're sleeping on a nailed together box spring :)

photo(4)

Monday, May 23, 2011

DIY Stenciled Rug

A few weeks ago, I got it in my head that I needed to try and stencil a rug. My miserable failure at my last stenciling attempt was still fresh in my mind but I convinced myself that trying it on a rug, free from any window frames or outlet covers to worry about was bound to be easier. As this was more experimental than anything else, I was determined to keep costs as low as possible.

I armed myself with an IKEA Erslev rug, a stencil from Cutting Edge stencils and some leftover paint from Knox's changing table makeover project that I combined with fabric paint medium to reduce the stiffness factor and make the whole thing washable.

I was all set to embark on some crazy math equations to determine where on the stencil I should begin my design when Mr. H+F chimed in with a perfectly sensible solution - "find the center of the rug and the center of the stencil and start there, then work your way out". BRILLIANT! See....he adds real value to my wacky ideas!

In the photo below, the blue painter's tape is marking the center of the rug. By starting there, I was able to {pretty much} insure that the design cut off in the same spot on the right, left, top and bottom. I throw in the pretty much because the loose nature of the Erslev makes the edges pretty uneven.

photo(50)

I also decided to tape off the top and bottom rug bindings to get a nice, crisp white line on the finished product.

photo(51)

I definitely had that moment of total, sheer panic when I finished the first pass with the stencil. What if it was totally crooked when I pulled it off? What if the paint had bled past the edges and looked like complete poop? It's not like a wall where you can just paint over your screw up and start over y'know?

photo(60)

I surprised even myself when I pulled it off and saw that it didn't look terrible. Dare I say, it actually looked kinda cool. But I was still too afraid at this point to declare it as a success. I only had to not screw up about 15 more times and then I'd be out of the woods.

photo(61)

So I kept going...and going...and going. And I had to relocate my whole project to the garage because my dog was determined to put her own mark (literally...as in yellow paws) all over the rug in the kitchen.

photo(54)


After several days worth of Knox's naps, I had this. I have to say, I'm pretty content with how it turned out overall. And I'm very happy I decided to tape off the bindings. I love the clean edge I got when I peeled off that tape.

photo(58)


You remember my quest to de-brownify my family room? Well this was definitely helping in that mission!

photo(59)


But sadly, we have wall to wall carpet in there and Mr. H+F has declared he is firmly opposed to rugs over carpet. :( So now my little experiment has no home. I'm thinking I'll hang on to it until I create a proper playroom for Knox. A colorful, cheap rug that he can grind Play Doh into without me crying might be just what I need!