Tuesday, April 3, 2012

IKEA Malm Dresser Makeover with O'verlays


I have been wanting to experiment with O'verlays ever since they came out.  I think the product is ingenious and the perfect way to elevate even the most mundane big box furniture.  So when my friend Christiane started thinking about redoing an old IKEA Malm dresser to use in her son Hudson's room, I jumped at the chance to help!

Hudson's room has some great roman shades made of Dwell Studio's Dotscape in Major Brown. 


And his ceiling is painted this super fun green.


After some brainstorming, we decided to pair a smokey, high gloss gray on the overall dresser with the Lolita circle O'verlays to play off the circle motif started on his roman shades.  Painted in the same green as the room's ceiling, it really brings the whole color scheme together.

I'm not going to re-invent the wheel and give you a whole tutorial on how to paint the dresser.  I'll defer to Kate's excellent posts on how to do that here.  I taped, primed (using my favorite primer - Zinsser Cover Stain) and painted it very easily since the Malm is just a bunch of flat surfaces with no nooks or details to speak of.  Pretty much a furniture painters dream!


There aren't a ton of colors in the Rustoleum Protective Enamel Oil line but if you can find one that works for your project I HIGHLY recommend it.   They're sold near the spray paints and come in quart size which is perfect for a small project like this.  And the best part - they're only about $8!  Yes, oil paint can be a pain to work with and clean up but I think it's completely worth the trouble for the professional looking finish you get.  Just be sure to follow your local waste regulations for disposing of your oil based paint cans.


After a couple of coats with a brush, I had this glass-like, perfectly glossy surface.  Oil paint takes a lot longer to dry than latex so resist the urge to touch it or do a second coat until you've let it completely dry (overnight is best).


So that was the easy part!  But then I got started on painting the O'verlays themselves and thought I was going to die.  My recommendation to you if you're considering using and painting some O'verlays - SPRAY PAINT, SPRAY PAINT, SPRAY PAINT!  Pick a color that you can spray on and don't look back.  

Since I wanted to match the O'verlays to the existing ceiling color, I started by rolling my paint on.  


 That was fine, except for this...


See all those totally-unreachable-by-a-roller nooks? After debating everything from hand painting all of them with a foam brush (aaaaargh!!!) to physically dipping the entire O'verlay into the can of paint (and then dealing with drips!), I remembered I had this Martha Stewart Crafts spray paint kit in my craft supplies.  The instructions make it pretty clear that it's for use with acrylic/craft paints but I was desperate. 


And guess what?!  IT WORKED!!!  The process for using the kit couldn't be easier.  You simply mix your paint with the spray paint medium included in the kit in a 1 to 1 ratio, attach the sprayer and start spraying.  You can watch Martha demo the process here.  About 2 oz of my Benjamin Moore latex paint is all it took to get complete coverage on all my O'verlays and save me hours of hand painting and cursing up a storm. I stuck them on with a little bit of Liquid Nails.


Here it is in Hudson's super cute room.


So let's recap what we've learned:
1.  Oil paint is awesome
2.  O'verlays are awesome
3.  When in doubt, spray, do not brush
4.  Go buy the Martha Stewart Crafts spray paint kit

Tuesday, March 6, 2012

New at IKEA for Spring 2012

My love for IKEA is well documented on this blog at this point so I was pretty giddy when the official "what's new at IKEA this spring" press release landed in my inbox.

Here are some of the highlights. 

Love the modern yet timeless silhouette of the new Preben chair.  I think it's meant to be a dining chair but it would look fantastic tucked under a thin console/desk.


It doesn't get much more classic IKEA than a streamlined, unfinished pine set of dressers.  The new Tarva line is just begging to be hacked and I predict we'll be seeing a rash of creative things done with these blank canvases. 


Three new light offerings coming this spring all utilizing LED technology.  The IKEA literature says these pendants are good for 3 hours of daily use for 20 years before they burn out!

 
Possibly the item I'm most excited about - the Raskog trolley.  Available in black and in this sweet turquoise finish pictured below.  I love the industrial vibe.  This versatile piece is sure to be a hot seller.  I can see it adding tons of mobile storage in lots of rooms - kitchens for pots & pans, pantries for baking supplies (you know I love my baking cart!), tight bathrooms for toiletries and towels, offices for printer/paper...need I go on?


Everyone's favorite line of dressers - the Hemnes - is now expanding into bathrooms with a line of
benches, medicine cabinets, shelving units and wash stands.


Cute new polka dot bedding in gray and red.  (aside:  you crazy Swedes had my lol'ing with the name of this bedding.  I mean seriously...these jokes just write themselves!)


And of course, the kiddies are not to be neglected with some adorable woodland stuffed animals.


There's plenty more to get excited about.  To see more of what's coming in the spring, check out this official IKEA release.   Do you have a favorite?

Wednesday, February 22, 2012

Things you should know about Vol. 2

You guys seemed to enjoy my last stream-of-consciousness "things you should know about" post so I'm back today with a second installment.  No rhyme or reason really...just stuff I've come across that I want to share.

Have you seen the newest campaign style furniture at World Market?  No it doesn't have the fancy brass pulls we all love but there are some sexy x-legs.  I particularly like this robin's egg beauty.  It's a like Parsons Desk meets campaign with its high gloss finish.  And only $200!!!


A perfectly proportioned corner changing table for those nurseries that are more nook than room.  This is so smart.


I'm always looking for ways to free up drawer space in the kitchen and currently one entire drawer is a zip lock/aluminum foil/plastic wrap jungle.  This little contraption only needs 5 1/4" of clearance and could easy be tucked into a cabinet above some juice glasses.  $9.71 and I've just reclaimed a full drawer of valuable kitchen real estate.  LOVE THAT!


Just the cutest hooded towels I've ever seen.  A viking hat with braids?!  Ridiculous cuteness. 


Indian Headress Hooded Towel


There's a whole bunch of new stuff at IKEA worth knowing about.  Rejoice IKEA Expedit fans!  The famous storage powerhouse now comes in high gloss gray and red.


Cribs are back at IKEA (they were recalled for a bit) and this new SUNKVIK in a pretty gray-brown is sure to show up in lots of modern, neutral nurseries.  For $119, you can't beat it!


Remember this post on kitchen utensil organization?  It featured this lovely image using what I'm sure are vintage ironstone pitchers ($$$) to corral various items. 


In lieu of a vintage ironstone pitcher collection, the rest of us can use these Sockerart white pitchers from IKEA.  They come in three sizes (6", 8.75", 12") and range in price from $7.99 to $19.99.  That's much more my speed!


Must remember this the next time I'm throwing a party.  Clear balloons, sprinkle some confetti inside, fill with helium. Takes balloons to a whole new level don't ya think?


Can't quite bring yourself to go bold with a dresser paint job?  Try this instead.  Just a peak of color....so fun!


Should I keep doing these stream of consciousness style posts every so often or are they too much randomness crammed into one post?

Tuesday, February 14, 2012

Get the Look: Crib Mattress Reading Nook

Don't you love the idea of a cozy reading nook where you can curl up with a good book?  A few IKEA pieces, an old crib mattress and some throw pillows and you're on your way!  I'm going to be needing Knox's crib mattress for a few more years but I'm definitely keeping this on hand for the day crib mattresses are behind us!


KEA 1x5 Expedit shelves:  Each shelf is 15" deep and a standard crib mattress is 28" so two Expedits back to back is perfect for this project.  $59 each

IKEA Branas baskets:  Five will give your reading nook a ton of storage but you can even double that and utilize the openings on the back Expedit.  $12.99

Kohl's Driftwood Wall Mirror $77.99

IKEA Ribba Ledge

Assorted Throw Pillows: (left to right)  1, 2, 3, 4

Monday, November 14, 2011

Pewter and Sage Mood Board Monday Dining Room

Today I'm excited to be taking part in my second Mood Board Monday over on Pewter + Sage.  If you're not familiar with the concept, Sarah provides one inspirational item or image and participants design a room - any room - around it.  Click here to see the first Mood Board Monday I participated in (and the first inspiration board I ever did on the blog!)

Today's challenge starts with some fabulous dinnerware so clearly a warm and inviting dining room was in order!  


Sarah gaves us a few choices but I picked the gorgeous Penumbral Doily Dinnerware from Anthropologie.  I was so inspired by the contrast in these plates.  They're an organic, imperfect terracotta form yet they're still so delicate with the impressed crocheted motif.   I decided to keep the play on contrasts going throughout the room with a casual yet refined dining room.  

This is the first non-kiddy room I've designed here on the blog so be kind!  Even though this is an inspiration board challenge and the sky is the limit on budgets, etc I tried really hard to only use items that I myself would have no issue buying.  I love Restoration Hardware furniture and Anthropologie lighting and all of that but I specifically challenged myself to design a room for under $3,500 (that didn't look like it!)  That's not chump change but if you've ever furnished and decorated a dining room you know it EATS money.  There are so many major furniture pieces to purchase (especially chairs!!) but I did it! 


I am not one for really fancy dining rooms with gobs of crystals and fancy, uncomfortable chairs. A room like this is much more my style - warm and inviting with a cozy, home-y feel.   I love the mix of woods and textures with just a hint of sparkle in the mercury glass lamps. I've swapped out two of the chairs (wishbone style knock offs from Overstock, WOOT!!) for a cushy and colorful armless settee. Instead of one big light, I've opted for two smaller iron orb pendants over a weathered harvest table.  A soft tone-on-tone chevron jute rug adds texture and just a hint of pattern to the room. Some green cotton curtain panels would be fancied up with Greek key trim and the burlap lamp shades would get just at touch of rusty orange with some velvet ribbon trim.  

Can you believe that sideboard is IKEA and just $199?  I love the gray finish!  I would add a single fun knob to bring out a little more of that rusty orange color from the settee.  $10 is a splurge for a knob but you only need one on this piece!  

And just in time for Thanksgiving, some adorable vintage brass wishbone charms are perfect for stringing up on twine and wrapping around napkins like this.


What do you guys think?  Can't you just imagine curling up on that sweet little settee with a slice of pumpkin pie after Thanksgiving dinner?  Head over to Pewter + Sage to see how everyone else interpreted their dinnerware.  I love seeing what everyone else comes up with!

GRAND TOTAL:  $3,383.81

SOURCES:
1.  Signature Burnished Cotton Silk Panels from Overstock

2.  2.5" Athena Trim in Leaf from Lewis & Sharon

3.  Petit Orb Chandelier from Ballard Designs

4.  Arcadia Extension Table from World Market

5.  Khandara Armless Settee from Amazon

6.  Wishbone Dark Wood Y Chair from Overstock

7.  Subway Art Family Rules from Etsy seller KariMachal

8.  Luna Antique Mercury Glass Lamp from Pottery Barn 
(with some luck, I bet you could find a similar style at Home Goods for much less!)

9.  Isala Gray Sideboard from Ikea

10.  Brilliant Blossom Knob from Anthropologie

11.  2" Velvet Ribbon in Rust from MJ Trim

12.  Chevron Jute & Hemp Rug from Serena & Lily

13.  Forest Photograph from Etsy Seller Eye Poetry Photography 

14.  Vintage Antique Brass Wishbone Charms from Etsy Seller EpochBeads

15.  Vintage Mustard Yellow Ceramic Horn Planter from Etsy Seller MelaniePeralto2

Monday, November 7, 2011

Get the Look: IKEA Besta Custom Buffet

Just because something looks really expensive doesn't necessarily mean it has to be.  Check out this gorgeous, totally custom looking modern buffet in HGTV designer Peter Fallico's home.   

Peter Fallico's Customized IKEA Buffet from Style at Home

Want to recreate this look?  Here's how (minus the end shelving units which I'm not really a fan of): 

Start with two of these IKEA Besta wall shelf units.  Set them on a platform like in the above image for added height or add a toe kick around it for a totally built-in look.


Add four of these Besta Vara doors in white.  The inspiration image has matte doors which the Vara are but I like these Tofta high gloss style doors even better...they're 5x the price though so maybe matte is just fine ;)


Finish the doors with two of these Chinese "Happiness" character brass cabinet face plates. 


What really takes the buffet in the inspiration photo to a whole other level is the marble top.  I don't know the price on what that would run but without it you're only up to $248.58 so you definitely have some wiggle room in there! 

Isn't it amazing how something like really special hardware can make even an IKEA cabinet look expensive?

The mirrors in the inspiration image are these from Horchow for $450 each (there are 3 there).  You can recreate the look by leaning two of these IKEA Stave mirrors side by side on top of the buffet.  


The ladies at O'verlays would be more than happy to whip up some custom sized fretwork panels for you to put on the mirror and really complete the look.  Custom orders average just $12/sq ft.

Here's a handy little reference guide for you to pin!


Thursday, June 16, 2011

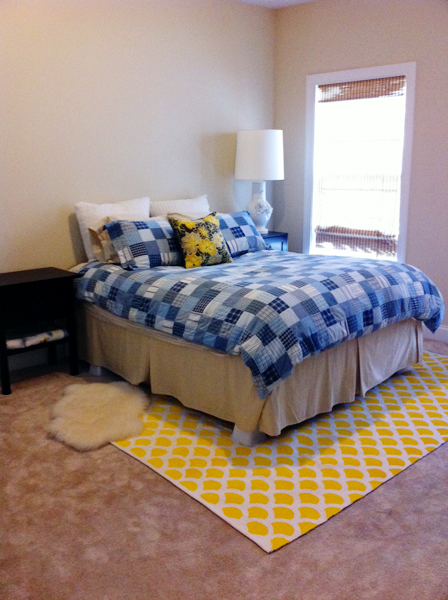
A home for my DIY stenciled rug (for now)

Lest you think that because I have a blog about pretty home stuff that my entire house is "done", today I'm sharing one of the most un-"done" rooms of all (one of...as in there is one more room that is even more of a disaster than this one!)

This is our second guest room. Eventually it will be Knox's big boy room where I'll set up the pair of Jenny Lind beds I got on Craig's List. But for the last 4 years it's looked like this.

photo


I'm always looking for ways to make it look better in there without spending any money until I convert it into Knox's room. Enter my DIY stenciled rug.

photo(7)


There is virtually nothing in this room that I care about at all. The duvet set is old Pottery Barn. The side table with the lamp on it is old Target. The other side table is old Crate & Barrel. Same beige color that was on all the walls when we moved in. Same beige carpet. The mattress and box spring were Mr. H+F's from his bachelor days.

{Funny story: This box spring is being held together by a few well placed nails. I helped him move into an apartment in Boston over 4th of July weekend about 9 years ago and the box spring got stuck in the staircase for 4 hours. Love those 200 year old brownstones! Totally jammed...not going anywhere. We had to take a saw to it and break it in half than nail it back together once we got it up the stairs.}

The only things I do like in this room:

My blanc de chine lamp that I found at the flea market years ago.

photo(2)


Photos from our trip to Thailand:

photo(6)


My collection (if you can consider 2 items a collection) of vintage suitcases:

photo(5)

Crazy what a little color can do right? Maybe the happy yellow will make my guests forget that they're sleeping on a nailed together box spring :)

photo(4)

Tuesday, May 31, 2011

Guest Room Tour

Today I'm sharing images of our guest suite. I decorated this particular room well before starting Honey + Fitz and as I was getting it ready to host our Memorial Day weekend guests, I realized that I've never properly photographed it or shared it with you all. The room has an en-suite bath that I'll post pics of eventually.

My inspiration for the room was this guest bedroom makeover originally featured in Cottage Living magazine. When I saw this image, I immediately fell in love with the cheerful yet serene feeling and thought it would make a very welcoming space for our guests. It feels comfortable and really approachable - not overly decorated or too precious - but still pretty.

sunny-guest-room-after-l


30895844_1Ki1F90J_c

I set out to create a similar look, using the spa blue and sunny yellow color combination as my starting point. Here's how my room came together.

wide-shot

The bedding in the original room is all custom. I was able to create a similar look by using Pottery Barn's Matine Toile duvet and euro shams in marigold. The sheets are Fieldcrest Luxury in Grey from Target and the matelasse coverlet was a Home Goods find.

euro-shams-3

euro-shams

The one thing I did sew up was this little lumbar pillow.

lumbar-pillow

No fuss, just a simple envelope closure with little white pom pom fringe to dress it up. It ties in with the curtains nicely. The insert is a 12"x24" lumbar pillow from Pottery Barn.

lumbar-pillow-3

Speaking of curtains, the ones in the inspiration room were made to match the custom duvet. Since I went off the shelf with my duvet, I decided to do something different with the curtains and made them using this fabric (Slubby Basket in white) and edged them in a 3"wide band of this fabric (Waverly Essence in spa).

curtains-2

They are a great weight while still letting in filtered light.

curtains-3

I couldn't afford to create a custom upholstered headboard like they did in the original room but I still needed something to act as the focal point behind the bed. Instead I took 5 Ribba frames from IKEA, spray painted them with Valspar's Mediterranean spray paint in high gloss and framed some pages from this book.

wide-shot-2

butterflies

The pages were much larger than the mat opening so a good bit of the design is hidden behind the mat but I don't really care. It actually gave me the freedom to move the print around and center what I felt was most interesting.

butterlfies-2

Instead of doing matching table lamps on the bedside tables, I opted for swing arm lamps. I wanted to leave guests with plenty of room on the nightstands for things like cell phones, water bottles and the general stuff you amass when traveling. I went with the Cortland swing arm lamp from Pottery Barn Kids in the oil-rubbed bronze (unfortunately discontinued it looks like). Don't neglect to look for stuff like this at "kids" stores. I was just buying the base and nothing about it says "kids" so I was able to get the look I wanted for less than it would have cost had I bought it from the regular "adult" side. I bought the shades at JoAnn Fabrics and used a little Fabri-tac to glue on some remnants of the same Waverly Essence in spa that I used on the curtains. I trimmed the edges in white hem tape.

swing-arm-lamp

One of the bedside tables in the room - a vintage find from the Raleigh Flea Market. I love the shape and the distressed, turquoise paint works nicely with the color palette in the room. The coral piece on top is from this eBay seller.

side-table

The other nightstand is an old Crate & Barrel piece that I painted (it started out black).

wide-shot

On it I keep a couple of decorative boxes I found at Marshalls and a book or two. I like to swap out the books I have on the nightstand by season. For summer, I always put out my most favorite summer book, One Special Summer by Jacqueline Bouvier and her sister Lee. It's filled with hand written notes and drawings from the sisters about their summer aboard the Queen Elizabeth and their adventures around Europe.

boxes

The room really has no interesting architectural features to speak of so I faked it by adding some trim moulding about 12" down from the ceiling all the way around the room. Sort of a fake picture rail. I painted it out in a high gloss white and then painted the ceiling and the 12" above the rail in Benjamin Moore's Ocean Air. The remaining wall below the rail I did in Benjamin Moore's Smoke Embers. This was pretty much an experiment as I wasn't sure if it would visually lower the ceiling but I can happily report that it totally does the opposite. The railing and the lighter ceiling color immediately draws your eye upward and gives the whole space a very airy quality that I love.

ceiling

I am on a slow but steady mission to rid my house of all the terrible, builder-grade boob lights we have. But lighting is expensive so I had to figure out a way to cheat a little. I bought a drum shade with a spider top at Home Goods, covered it in some linen fabric and and sandwiched it between the boob light and the ceiling.

ceiling-shade

I will do a more detailed post on how I did this later in the week. The result as you can see above is acceptable, though the view from below is anything but fancy.


So what's left for this room?

#1: Lighting! This drum shade over boob light thing is only a temporary solution. I think I've decided that I want to do a Moravian star pendant in its place and have finally found a decent price on one here. If you know where I can get a 20" version of this light for less, please let me know!

#2: The entire wall opposite the bed. You know how I like to keep it real with you guys, so here goes. On the other side of the room I have this bamboo framed mirror that I picked up at Goodwill for $20.


I got as far as giving it a coat of Benjamin Moore's Twilight Blue which is like an inky, navy blue color. I don't know if it will stay in the room but for now it's perched in the corner because I haven't been motivated to hang it (it weighs approx. 900 lbs).

bamboo-mirror


I also have this chest from my single days. It totally doesn't work in the room but it's in perfect condition and at the time I put the room together, I wasn't ready to get rid of it. Perched on top is my 22 year old Sanyo television (that is not an exaggeration).

other-wall

I've been considering swapping out the chest for my campaign dresser which I'm thinking of painting ivory, a grayish blue (like the one used on the armoire in the original inspiration image) or coral. I know...you're like coral?? but I can't stop thinking about how hot it would look with the brass hardware).


Then maybe I'll put my vintage faux bamboo mirror over it and spring for a small LCD tv of this century for my guests.

That's all for now! Will report back when I wrap up these other items. 

UPDATE!! I actually finished this wall with the campaign dresser.  Here's how it turned out:  


See more of the dresser transformation here.