Tuesday, April 3, 2012

IKEA Malm Dresser Makeover with O'verlays


I have been wanting to experiment with O'verlays ever since they came out.  I think the product is ingenious and the perfect way to elevate even the most mundane big box furniture.  So when my friend Christiane started thinking about redoing an old IKEA Malm dresser to use in her son Hudson's room, I jumped at the chance to help!

Hudson's room has some great roman shades made of Dwell Studio's Dotscape in Major Brown


And his ceiling is painted this super fun green.


After some brainstorming, we decided to pair a smokey, high gloss gray on the overall dresser with the Lolita circle O'verlays to play off the circle motif started on his roman shades.  Painted in the same green as the room's ceiling, it really brings the whole color scheme together.

I'm not going to re-invent the wheel and give you a whole tutorial on how to paint the dresser.  I'll defer to Kate's excellent posts on how to do that here.  I taped, primed (using my favorite primer - Zinsser Cover Stain) and painted it very easily since the Malm is just a bunch of flat surfaces with no nooks or details to speak of.  Pretty much a furniture painters dream!


There aren't a ton of colors in the Rustoleum Protective Enamel Oil line but if you can find one that works for your project I HIGHLY recommend it.   They're sold near the spray paints and come in quart size which is perfect for a small project like this.  And the best part - they're only about $8!  Yes, oil paint can be a pain to work with and clean up but I think it's completely worth the trouble for the professional looking finish you get.  Just be sure to follow your local waste regulations for disposing of your oil based paint cans.


After a couple of coats with a brush, I had this glass-like, perfectly glossy surface.  Oil paint takes a lot longer to dry than latex so resist the urge to touch it or do a second coat until you've let it completely dry (overnight is best).


So that was the easy part!  But then I got started on painting the O'verlays themselves and thought I was going to die.  My recommendation to you if you're considering using and painting some O'verlays - SPRAY PAINT, SPRAY PAINT, SPRAY PAINT!  Pick a color that you can spray on and don't look back.  

Since I wanted to match the O'verlays to the existing ceiling color, I started by rolling my paint on.  


 That was fine, except for this...


See all those totally-unreachable-by-a-roller nooks? After debating everything from hand painting all of them with a foam brush (aaaaargh!!!) to physically dipping the entire O'verlay into the can of paint (and then dealing with drips!), I remembered I had this Martha Stewart Crafts spray paint kit in my craft supplies.  The instructions make it pretty clear that it's for use with acrylic/craft paints but I was desperate. 


And guess what?!  IT WORKED!!!  The process for using the kit couldn't be easier.  You simply mix your paint with the spray paint medium included in the kit in a 1 to 1 ratio, attach the sprayer and start spraying.  You can watch Martha demo the process here.  About 2 oz of my Benjamin Moore latex paint is all it took to get complete coverage on all my O'verlays and save me hours of hand painting and cursing up a storm. I stuck them on with a little bit of Liquid Nails.


Here it is in Hudson's super cute room.


So let's recap what we've learned:
1.  Oil paint is awesome
2.  O'verlays are awesome
3.  When in doubt, spray, do not brush
4.  Go buy the Martha Stewart Crafts spray paint kit

Wednesday, March 28, 2012

DIY Recycled Toddler Table & Chairs


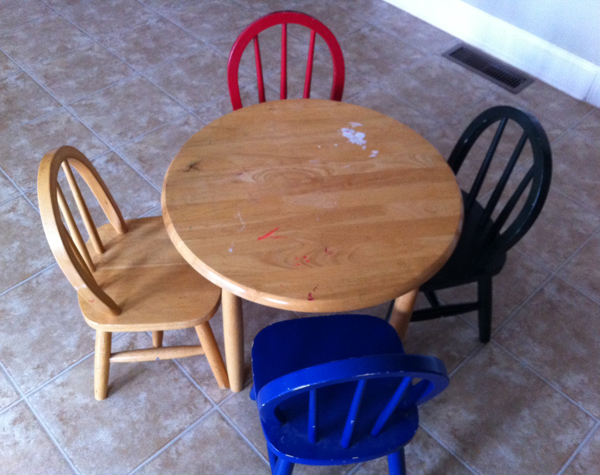
A few weeks ago while out on a family walk, we came across a neighbor getting rid of a very well loved but totally adorable mini table and chairs.  I've been on the lookout for a little set like this for Knox so when I saw these just sitting on the sidewalk being given away (yes, free!!) I snatched them right up!


While this set isn't exactly what I was planning to buy (I was going to go with a square top table with a craft paper roll attached + 2 Panton Jr chairs), I could not pass up the free price!  Plus I love that this set has already seen many hours of creative play.  A couple of the chair were covered in little heart shaped stickers and the table surface showed some definite signs of overzealous crafting.  I was determined to make it work and transform the set as cheaply as possible. 


A little Goo Gone lifted the stickers and residue right off.  I gave all the pieces a slight sanding and then got busy priming.


Zinsser Cover Stain is my go-to primer.  Especially for pieces that are going to see lots of action like these!  I used the brush on variety for the table top because it goes on a little thicker, thus giving you better coverage.


I started off brushing the primer on the chairs too and quickly abandoned the brush in favor of the spray variety.  All those nooks and spindles were killing me with the paint brush!


Once I switched to the spray primer , things went very fast and I had it all primed and ready for painting within 20 minutes.  


I knew a chalk top would be the easiest way to transform the table.  I felt like it was a good compromise for making a creative surface without mounting a craft paper roll like I had originally wanted (and couldn't figure out how to make work on a round top.)  Two coats of of Rustoleum chalk paint and I was done.


Priming the chairs with the spray primer convinced me that I absolutely had to find a spray paint color that would work.  NO HAND BRUSHING!  I settled on this pretty aqua color.  I wanted something that was gender neutral and would look pretty with the chalk tabletop.


Oh how I love spray paint!  This went so fast, I couldn't believe it.


Three cans, two coats on everything - I was done in less than an hour (and that includes drying time between coats!)


Once everything was dry, I wiped all the pieces down with a damp cloth, then finished them with 2 coats of Minwax polycrylic in clear semi-gloss.


The last step to any chalk paint project is to "condition" the surface by rubbing chalk all over it and then wiping it off with a dry cloth. 


Now the surface is ready to use!  I also love that this step makes the chalk a more subtle gray and not such a stark black.


Here's the finished set tucked into the corner of our family room.  I love it so much more than all the mismatched primary colors before!


And I have to say, the little Windsor back chairs are so adorable in this bright blue. I'm really happy I didn't ditch them and buy the more modern Panton, Jrs for this set (though someday they will be mine!)

I've put away two of the chairs because...


...rather than sit on them, Knox prefers to use them as a perch for his soliloquies.


One last look at the before & after side by side.  Amazing what some spray paint can do!

Wednesday, February 29, 2012

Joy Cho's Colorful Campaign Dressers for Baby Ruby

Remember this adorable image that I shared in my 5 Inspiring Dresser Makeovers post?  That rainbow colored campaign dresser belongs to Joy Cho of Oh Joy! fame and graces her lucky little girl Ruby's nursery. 


Well today, Joy shared more images of the whole nursery and much to my delight, there isn't one but TWO of these tall chests.  Holy cuteness!  I can't even deal. Love the colors, love the vertical storage, love that there's two of them!!!!


The rest of the room is pretty spectacular too. 


all images via Oh Joy!

See more of it here and here.

Wednesday, February 22, 2012

Things you should know about Vol. 2

You guys seemed to enjoy my last stream-of-consciousness "things you should know about" post so I'm back today with a second installment.  No rhyme or reason really...just stuff I've come across that I want to share.

Have you seen the newest campaign style furniture at World Market?  No it doesn't have the fancy brass pulls we all love but there are some sexy x-legs.  I particularly like this robin's egg beauty.  It's a like Parsons Desk meets campaign with its high gloss finish.  And only $200!!!


A perfectly proportioned corner changing table for those nurseries that are more nook than room.  This is so smart.


I'm always looking for ways to free up drawer space in the kitchen and currently one entire drawer is a zip lock/aluminum foil/plastic wrap jungle.  This little contraption only needs 5 1/4" of clearance and could easy be tucked into a cabinet above some juice glasses.  $9.71 and I've just reclaimed a full drawer of valuable kitchen real estate.  LOVE THAT!


Just the cutest hooded towels I've ever seen.  A viking hat with braids?!  Ridiculous cuteness. 


Indian Headress Hooded Towel


There's a whole bunch of new stuff at IKEA worth knowing about.  Rejoice IKEA Expedit fans!  The famous storage powerhouse now comes in high gloss gray and red.


Cribs are back at IKEA (they were recalled for a bit) and this new SUNKVIK in a pretty gray-brown is sure to show up in lots of modern, neutral nurseries.  For $119, you can't beat it!


Remember this post on kitchen utensil organization?  It featured this lovely image using what I'm sure are vintage ironstone pitchers ($$$) to corral various items. 


In lieu of a vintage ironstone pitcher collection, the rest of us can use these Sockerart white pitchers from IKEA.  They come in three sizes (6", 8.75", 12") and range in price from $7.99 to $19.99.  That's much more my speed!


Must remember this the next time I'm throwing a party.  Clear balloons, sprinkle some confetti inside, fill with helium. Takes balloons to a whole new level don't ya think?


Can't quite bring yourself to go bold with a dresser paint job?  Try this instead.  Just a peak of color....so fun!


Should I keep doing these stream of consciousness style posts every so often or are they too much randomness crammed into one post?